GINGERBREAD COOKIES

/ Monday, 28 December 2015

No comments


Oh dear, I'm kinda late with Christmas recipes this year... I really wanted to put this recipe on my blog before the Christmas Eve as these are my favourite festive cookies I've ever done + I wanted you to try this recipe out, but then... Oh, well... Life happened. So, let's considerate this post as a Christmas diary entry thing? How about that?

Seriously though, these cookies are super soft, spicy and there's literally no way to mess them up.


INGREDIENTS:

300g plain flour ( + some extra flour to roll the dough)
150g honey
200g caster sugar
100g butter (cutted into small cubes)
1 large egg
1 egg yolk
1-2 tablespoons of gingerbread spice mix*
1/2 teaspoon bicarbonate of soda

Icing:
2 egg whites
150-200g icing sugar
sprinkles


*you can buy it or make your own spice mix by blending together 2 tablespoons of ground cinnamon, 2 tablespoons of ground ginger, 1-2 teaspoons of freshly grated nutmeg, 1-2 teaspoons of ground cloves, 3-4 whole star anise seeds (ground), 10 coriander seeds (ground), 10 cardamom pods (ground), 1 teaspoon of unsweetened cocoa powder, pinch of white pepper. Obviously, you can change the proportions on your wish or eliminate some of the spices, if you don’t like them at all.


METHOD:

First of all, preheat the oven to 170ºC.
Grab a saucepan, put honey and spice mix into it and bring the mixture to boil, stiring occasionally. 
Meanwhile, in a large mixing bowl, sift the flour. Once the flavoured honey hits its boiling temperature, pour it into the bowl, trying to cover all the flour surface. Stir it thoroughly with a spoon and set aside for a couple of minutes. Then add the eggs, butter, sugar and bicarbonate of soda.
Now it’s time to get a lil’ bit messy! Work the dough with your hands until all the ingredients are well combined. The dough should be soft and a little bit sticky, but easy to roll once sprinkled with some extra flour.
Roll the dough to about 1-1,5cm thickness and cut out any shape you want your cookies to be. Mine are just simply rounded cookies ‘cause I’m a lame cookie conservative, don’t judge me. Remember though, that the bigger ones may need extra minutes to bake.
Put the cookies onto a tin covered with a sheet of parchment paper and bake for about 7-10 minutes or until they look dry and slightly golden on the surface.

Icing:
Beat the egg whites with an electric mixer and add the icing sugar spoon by spoon until thick ribbons form when the whisk is lifted. You can flavour the icing with some drops of lemon/orange juice or add any kind of extract of your choice.

NB. Be sure that the cookies are completely cool before you decorate them!

Conserve them in a jar or an airtight container for up to 1 month.

HONEY & ORANGE MARSHMALLOWS

/ Thursday, 10 December 2015

No comments


After months of absence, I finally decided to dust off this little blog and make something that I've never tried before: homemade marshmallows.
I mean... I've already tried that once, but I majestically failed, even though I've followed every single step as the author has explained in his recipe. I don't know what happened, but at last, I told myself that I need to embrace my defeat and try to do homemade marshmallows once again. At least one time before I die, just to make sure that the horrible experience I was going through was not my fault. Not at all.

So, here we go! I did a lot of research about homemade marshmallows and I think I made a perfect recipe that suits me better than the ones we can already find online. Also it's corn syrup free!

NB. The recipe has raw eggs, though. Honestly, I have never freaked out about raw eggs... My nan used to make things such as kogel mogel when I was a kid, so having raw eggs on my kitchen basis is just normal for me :D
Also I believe that the egg whites add extra fluffiness to the marshmallows, so why shouldn't I use them?


INGREDIENTS:

2 eggs (whites only)
1 cup caster sugar
1,5 tablespoon honey
6 gelatin sheets
1/4 cup water (for gelatin)
1/4 cup water (for sugar syrup)
pinch of salt
1 teaspoon orange extract*
2-3 tablespoons icing sugar
2 tablespoons cornstarch

* I've got a little of extra marshmallow mixture, so I spiced it furtherly with cinnamon and nutmeg. Delicious in both ways!

METHOD:

First of all, prepare a square tin with medium/high sides: spray non-stick cooking spray onto the bottom and the sides of the tin (or use a little bit of butter) and put in the parchment paper or the plastic wrap. Make sure that every single inch of the tin is well covered.
In a saucepan, mix together 1/4 cup of water, sugar, honey, orange extract and salt. Bring it to boil on a small/medium heat, until the hard ball stage**.
In another saucepan (the smaller the better) pour 1/4 cup of water and put the gelatin sheets in. Wait a couple of minutes until the gelatin sheets become soft and jelly, then put the saucepan on a small heat for about 1-2 minutes or until the gelatin melts.
Meanwhile, beat egg whites in a large mixing bowl. Once they are thick, pour slowly the sugar syrup (make sure it has the right temperature: in fact, I highly suggest to beat the eggs before the sugar syrup is done, so you can pour it into the bowl at the exact moment of the hard ball stage) and beat the mixture for about 30sec/1min. Then add melted gelatin and continue to mix on medium/high speed for about 15-20 minutes or until it becomes fluffy and gooey.
Put the mixture into the tin, spread with a spoon or a spatula, cover it with a dish towel to make it safe from dust, flies and other nasty bugs (the towel shouldn't touch the marshmallow). Leave it to settle for minimum 12h.

For cutting: whisk together the icing sugar and cornstarch. Sprinkle it on the surface you're working on and lay down the marshmallow square. Sprinkle another bit of powder mixture on the top and cut it into cubes or whatever shape you want your marshmallows to be. Remember to use a sharp knife, though!
Once cutted, dip the marshmallows in remaining powder mixture and then shake off the excess. They shouldn't be sticky anymore. Store them in an airtight container for up to 1 week, although I'm pretty sure they will disappear in a couple of days.

Done! Now you can enjoy your yummy homemade marshmallows :D

** Check out THIS video demonstration of bringing the sugar syrup up to the hard ball stage.

Song of the day: Modern English - I melt with you

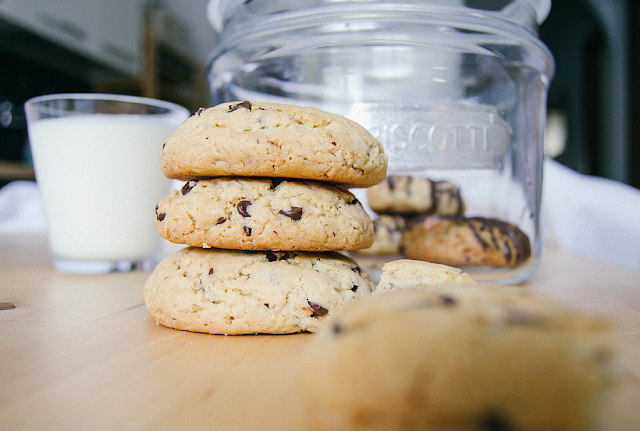
CHOCOLATE CHIP COOKIES

/ Wednesday, 22 July 2015

No comments


Oh God, there's so much stuff happening in my life recently that I don't have much time to bake new things nor to lie down and just listen to my favourite songs while complaining the summer and the mediterranean heat with a giant bag of ice cubes leaned on my neck...

Regarding to that horrific lack of time and force to work on new recipes, today I'm gonna share this super quick chocolate chip cookies recipe that I made almost 5-6 weeks ago and never shared before (I don't even know why...)
This is not a classic chocolate chip cookies recipe: I started from the original recipe of Nigella Lawson and modified it as well as I wanted to create a little bit different texture and flavour of the cookies. So, if you want to check out the original ingredients, scroll down and click on the link down below. Though, I absolutely suggest you to try my recipe as it's simple, delicious and brings you into a whole new dimension of the cookies world :D


INGREDIENTS:

120g unsalted butter
30g shortening
100g brown sugar
100g caster sugar
2 tsp vanilla extract
1 egg
1 egg yolk
290g plain flour
20g buckwheat flour
1/2 tsp bicarbonate of soda
pinch of salt
320g chocolate chips
3 tbsp oat flakes
1 tbsp sunflower seeds


METHOD:

Preheat the oven to 170C.
Carefully melt the butter and the shortening in a small saucepan, then leave until cool.
Grab a large mixing bowl and put the sugars into it, add the cooled butter and beat them together with an electric mixer for about 2-3 minutes. Then you can start adding other ingredients as the vanilla extraxt and eggs. Beat the batter until it becomes light and creamy.
Finally, add the flours (there's no need to be sifted), bicarbonate of soda and salt. Do it it more steps as the dough obviously must gain weight and thickness, so at some poit it would be very difficult to keep managing it with the electric mixer - in this case just keep working with a wooden spoon or your hands.
When the dough absorbe the whole flour, it's a sign that it's ready! Oh, almost ready... We still need to incorporate chocolate chips and oat flakes. Now, the oat flakes are absolutely optional! Personally, I divided the dough in two parts: the first one was with chocolate chips only, and the second one with chocolate chips, oat flakes, sunflower seeds, topped with melted chocolate.
Just add the ingredients on your wish to the dough and mix them well.

It's time to mould the balls! I think the perfect size of the dough balls is approximately a ping pong (or golf) ball sized shape, but obviously it's up to you to choose which size suits you better. Remember, though, that if you want a bunch of giant cookies, it would take more time to bake them in the oven.

Once placed on a tin (put a sheet of baking paper to prevent burns and sticked cookies), put them in the oven and bake for about 15-17 minutes.

Conserve them in a jar even for 5-6 days! But trust me, they'll be gone in less than 5 hours :D


Song of the day: twenty one pilots - Ride


Chocolate & Blueberries Cupcakes

/ Sunday, 24 May 2015

No comments

It’s been ages since I baked something with blueberries, so I thought it would be cool and appropriate to take the occasion, buy these seasonal fruits and use them for a cupcake recipe.
As usual, it’s a very simple recipe and you really don’t have to be a high qualificate pastry chef to do them. Also they are super fluffy, tasty and absolutely perfect for a late spring tea party in the garden or staying locked down in your room whilst watching 10 episodes of your favourite tv show (obviously in tears because we are young and we have no life).

Turn on the radio or your favourite spring-y playlist and let’s get started!


INGREDIENTS:
(makes 26-28 cupcakes)

175g unsalted butter (softened)
100g chocolate (70%)
300g plain flour
1 tsp baking powder
1 tsp bicarbonate of soda
275g caster sugar
1 tsp vanilla extract
3 eggs (lightly beaten)
200ml milk
1 tbsp vinegar
80g chocolate chips

FROSTING:

500g cream cheese
50g unsalted butter (softened)
250g icing sugar
1 tsp vanilla extract 
300g blueberries
chocolate chips


METHOD:

Preheat the oven to 180.
Put the chocolate into a mixing bowl (metal or glass one) placed over a saucepan with simmering water (this method is called bain-marie - nb. the bottom of the bowl shouldn’t touch the water, otherwise it would compromise the melting process). Stir the chocolate until melted, then set it aside to cool.
In another bowl, sift together the flour, baking powder, bicarbonate of soda and once again, set the bowl aside.
Put the milk and the vinegar in a cup, stir and set aside.
In a third large mixing bowl, beat together the butter and sugar until very light and fluffy. Then add slowly the eggs and the vanilla extract, still beating. When it’s well combined and fluffy, add melted chocolate and the milk mixture. Continue beating until smooth. Finally, add the flour mixture in 3 steps and when the batter becomes well combined, turn off the mixer, add chocolate chips and stir the batter with a wooden spoon.

Fill up the paper baking cups to about 1/2 - 3/4 to the way up and bake for about 15-20 minutes.


Once baked, set them aside until completely cool. 
Meanwhile you can prepare the frosting, which is pretty simple to do as well:
Beat the butter, cream cheese and vanilla extract until light and fluffy. Then add the icing sugar in two steps, beat for another 2-3 minutes... and it’s done!

For decorating, you can use a piping bag with nozzles of your choice or you can just put the frosting with a small spatula/spoon for a rough and kinda rustic look. I used a spatula just because my piping bag shattered a few days ago and I still haven’t bought a new one… Shame on me!
However, once you put the frosting on your cupcakes, you can decorate them whatever you want them to look like… I put blueberries and chocolate chips on top but you can use any kind of fruits of your choice (nb. strawberries or raspberries taste really good with chocolate cupcakes).
Anyway, give them a try!


Song of the day: The Beach Boys - Kokomo

White Chocolate & Strawberry Muffins

/ Friday, 15 May 2015

No comments


Rainy and gloomy morning? There’s no better excuse to lock yourself in the kitchen and bake muffins! I craved something semi-sweet and simple for breakfast and I took the occasion that I’ve had fresh strawberries and some leftover white chocolate in my pantry.

Also I've turned on my Spotify playlist, full of classic/hard rock songs and just started baking.

This recipe is very simple and pretty quick to do + you can settle the amount of sugar on your personal preferences. I don’t really like excessively sweet muffins, so I reduced the grams of sugar (at least I popped sweet white chocolate in the batter, so I think the final result is right balanced).


INGREDIENTS:
(makes 9 small/medium muffins)

75g caster sugar
90g unsalted butter (softened)
2 medium eggs
180g plain flour (sifted)
30g ground almonds
1 tsp vanilla extract
1,5 tsp baking powder
1/2 tsp bicarbonate of soda
100ml milk
pinch of salt
75g white chocolate (chopped - you can use chocolate chips as well)
150g strawberries
icing sugar 

METHOD:

First of all, preheat the oven to 175
Beat the butter and the sugar in a large mixing bowl until light and fluffy. In another bowl, mix together the plain flour with ground almonds, baking powder, bicarbonate of soda, and salt - remember to sift the flour, otherwise you risk to bake sticky muffins with ugly lumps.
Add the eggs + vanilla extract into the bowl with the butter mixture, once at time, still beating. When the eggs are well combined, add milk and finally the flour mixture in 3 steps. Beat until all the flour is well incorporated.
Cut strawberries into small/medium cubes and add them to the batter. Finally pour white chocolate and stir carefully the whole mixture with a spatula or a wooden spoon.

Fill up the paper baking cups to about 3/4 to the way up. Bake for about 22-25 minutes.

I usually pour a little bit of classic crumble on each muffin before I put them into the oven, but this time I didn’t have enough butter to do that, so I just dusted them with a simple icing sugar. Yummy in either way!


© CRYSTAL SPOON BAKERY. Design:Maira Gall.